
In this tutorial, we’ll set up a marketplace for digital products. This is a no-code tutorial, where all settings are configured without coding, using Sharetribe's no-code marketplace builder and integrations.
We’ll go through the design, listing, transaction, and content settings that are most relevant for digital product marketplaces. The example platform we're building is a marketplace for t-shirt print designs called Teetribe.
Please note that building a digital product marketplace with Sharetribe requires some manual or Zapier workarounds. The purpose of this tutorial is to create the first version of your marketplace fast and without coding, so that you’ll be able to validate your marketplace idea. Once you know it’s worth investing more in, you can start building custom functionality on top of Sharetribe to fully automate digital file selling.
If you're looking for a particular feature or haven't found what you're looking for, take a look at our Help Center or reach out to our support team through the chat widget in the corner.
1. Create your account
This tutorial assumes you have a Sharetribe account. If you don’t, start your 14-day free trial. No credit card required.
You’ll give your marketplace a name at this stage (you can still change it later) and answer some questions about your marketplace idea. Sharetribe configures your account based on these answers, but you can still change all of the settings later.
Let’s get to the tutorial!
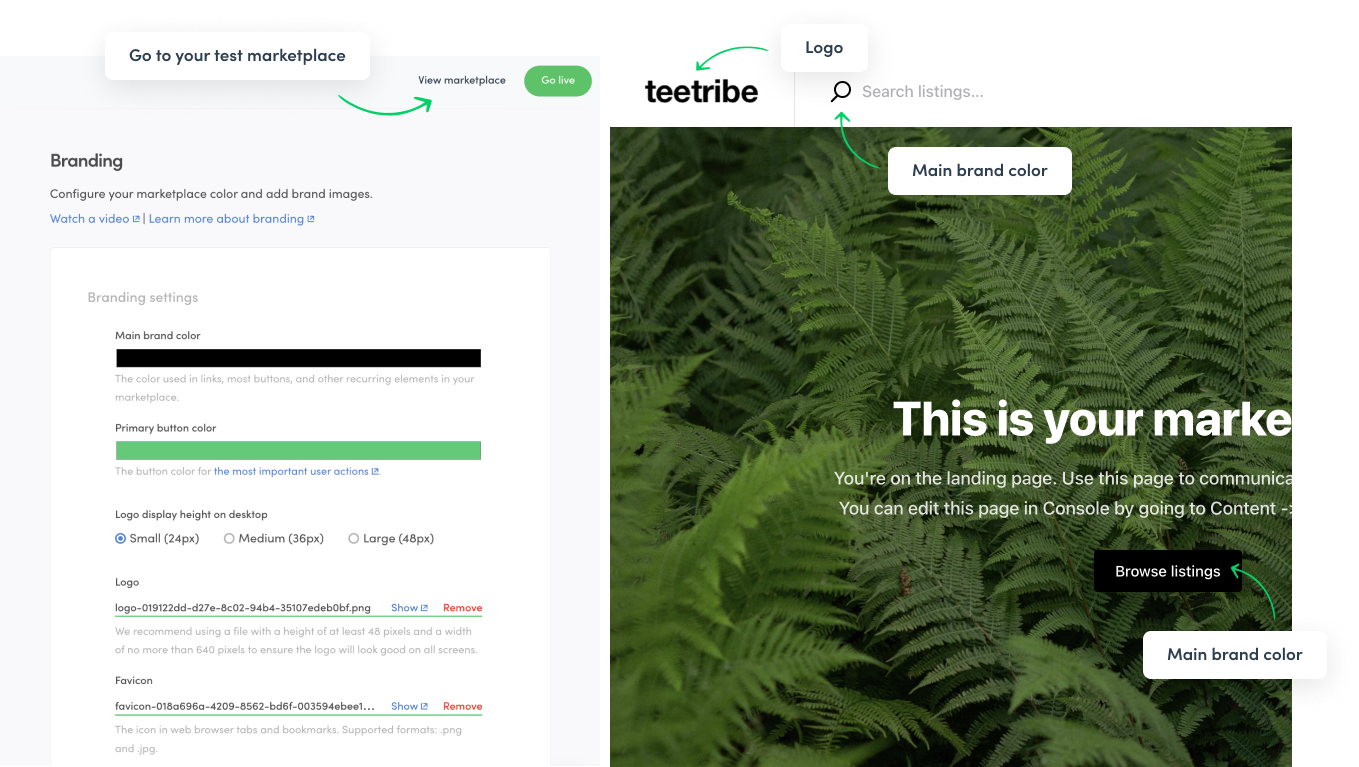
2. Add your branding
We’ll start with something every marketplace needs: branding. In the branding settings, you determine your marketplace colors and visual assets.
Go to Design → Branding.
Update your main brand color. This color is used in most recurring elements on your website.
Upload a logo.
Choose a logo display height.
Upload a favicon.
You can check how the settings and images look on your test marketplace, which you can access through the View marketplace link in the top right corner.
5. Optional: change the primary button color.
6. Optional: upload an app icon, background image, and social media image.
7. Save changes.
If you don’t have your brand assets ready yet, you can keep the default assets for now and update them later.
3. Choose the layout
Your layout settings are defined based on your answers to the setup wizard. It’s still good to check that they match your idea.
Consider your marketplace carefully. We’re building a marketplace for digital image files, so the search page and listings should feature these pictures heavily, as this is an important part of a purchase decision.
Go to Design → Layout.
In Console, final layout settings for this marketplace will look like this:
Here are the reasons behind each choice:
Search page: Grid view. Listings will be presented in a grid on the right with categories and filters on the left in a side panel.
2. Listing page: Image carousel with thumbnails. The page features a carousel of images uploaded about the listing, followed by custom listing data. On the right side, customers will find the price, delivery options, an order breakdown and a Buy now button.

3. Listing thumbnail aspect ratio: Square (1:1). This setting depends on the types of files you’re selling. The listings in Teetribe are image prints, so the best option thumbnail ratio is square, as it accommodates both portrait and landscape prints. For other items, the best aspect ratio may be different.
4. Configure the listing type and transaction process
Next, we’ll check the listing type settings. The listing type is set up for you based on your setup wizard answers, but it’s still good to confirm it fits your needs.
The listings on our marketplace are digital products, meaning that the products are infinitely reproducible. A customer only needs to download the product once to be able to use it multiple times. We’ll set up the listing type to support this type of product.
Go to Listings → Listing types.
Set your listing type like this:
Here’s more detail and the reason behind each setting choice:
Listing type name: a descriptive name. In Teetribe, the name will be “Purchase”. If you have more than one listing type, this name will be shown to users in listing creation.
Listing type ID: a unique identifier of the listing type. It’s used when you want to limit listing fields to specific listing types only. (We’ll set up listing fields later in this tutorial.)
Transaction process type: Purchase. This is the transaction process for product sales.
Stock type: Infinite stock, single item. This means that the seller 1. has an unlimited supply and 2. products are always sold one at a time.
Delivery options: Disable both pickup and shipping. Since the products on your marketplace are digital, no physical delivery needs to take place. Instead, this will happen manually or through automation with Zapier (which is a later step in this tutorial).
Payout details required before publishing: Enable or disable. This setting determines when a seller needs to add their payout details.
When enabled, the seller has to add their payout details before they can publish the listing.
When disabled, the seller can add them after publishing the listing. Note that buyers can’t make a purchase before the sellers adds their payout info.
5. Add listing fields
It’s time to create listing fields. Listing fields are unique information you want sellers to add to their listings. Customers, on the other hand, can filter search results based on them.
Go to Listings → Listing fields.
Give the listing field a descriptive name.
Add a listing field ID. The ID is a unique identifier of the field.
Choose the field type. Your options are free text, number, select one, and select multiple.
Decide if the field type is mandatory for the seller to fill.
Determine listing field specific settings. These vary depending on the field type.
Enable the filter as a search filter to include it on the search page.
Here's an example of a listing field in Console and on the marketplace:
6. Configure search settings
The final listing settings are about search.
Go to Listings → Listing search.
For a digital product marketplace, set up the search as follows:

Here’s the reason behind each setting option:
Search type: Keyword search. Since location is not relevant on a digital product platform, the primary search function will be by keyword.
(Keyword filter: Disable. Only available with location search.)
Category filter: Disable. In this tutorial we did not add listing categories. If you do, you can enable this filter.
Date range filter: Disable. There are no time-based bookings on our platform, so there’s no need for this filter.
Price filter: Enable or disable. If you enable the filter, enter in the minimum and maximum values. Turning on this filter let’s customers filter by their desired price range. Choose the values based on the price range of items on your marketplace.
7. Define commission rates
Next, we’ll determine commission rates. This is how we’ll monetize our platform.
You can charge a commission from the seller, customer, or both:
The seller’s commission is deducted from the listing price.
The customers’s commission is added on top of the listing price.
The users don’t see each others’ commissions during a transaction.
When deciding your commission rates, you should consider at least the following:
Your commission rate(s) should not be so high as to drive off customers and sellers. You should take into account factors like the average price of listing, competitive landscape, and the value you provide.
When choosing who to charge, consider which group—customers or sellers—you’re more constrained on. Don’t implement fees (or as high a fee) for the group that’s tougher for you to reach.
Sharetribe uses Stripe to facilitate transactions. Stripe charges a payment processing fee from each transaction and it’s charged from the marketplace’s commission. Calculate your commission so that you can be sure it covers Stripe’s fees.
Learn more about finding the right commission rate in Marketplace Academy.
This video breaks down the commission feature of Sharetribe in a quick and concise way:
Go to Monetization → Commission.
In our example marketplace, the commissions will be:
Provider commission: 10%. Charged from sellers.
Customer commission: 5%. Charged from customers.
This is how the commission settings look like after these changes and how the seller and customer see them, respectively:
8. Automate file sharing through Zapier
While Sharetribe doesn’t have a built-in system for file downloads and uploads, it’s possible to automate this file sharing as a part of a paid transaction. You do this through Sharetribe’s Zapier integration. Zapier is a tool that lets you connect and automate tasks between different web apps.
With Zapier, you can create the following workflow:
When a seller adds a listing, they receive an automated email from the marketplace that requests a download link of the file in question.
The seller answers the email with the download link to the listing.
When someone makes a purchase, they will automatically receive the link the seller provided.
You can achieve this with two ready-made Zap templates. Follow the tutorials below to set up automated download link collection and delivery:
Zapier is a Pro plan feature.
If you don’t want to use Zapier, you can also create a manual link-sharing workflow for your marketplace’s first version. Instead of automating link collection and sending, you can instruct sellers to share a link to download the file in the transaction conversation after purchase.
9. Edit marketplace texts
Marketplace texts are short pieces of text used across your marketplace website. This includes button labels, error messages, help texts, and more.
We’ll edit a small number of marketplace texts that are relevant to digital product marketplaces. While the marketplace text editor may feel daunting, it’s easy to edit once you get the hang of it. It gives you a lot of control over the language and terms used across your marketplace.
Go to Content → Marketplace texts.
The following changes take into consideration the specific niche of your marketplace. Instead of listings, you can modify the texts to refer to your marketplace’s unique offering. The proposed changes also remove mentions of stock from listing creation, as it does not apply on a digital product marketplace and modify the wording around product delivery.
Always leave the text string ID intact. Edit the contents of the quotes after the color (:) only.
Update the search placeholder text. Click your cursor to the text editor. Type
CMD+F (Mac)orCTRL+F (PC).Search
"TopbarSearchForm.placeholder": "Search listings…"In the text, update
Search listingstoSearch [insert your marketplace offering here]. For example, in Teetribe, this text could beSearch designs.Search
"NotFoundPage.SearchForm.placeholder": "Search listings…"Update this the same way as you did the text above.
Update the Post a new listing button.
Search
"EditListingPage.titleCreateListing": "Post a new listing"In the text, update
Post a new listingtoList a [insert your marketplace offering here]. On Teetribe, this would beList your design.
Update the listing creation form.
Search
"EditListingDetailsForm.title": "Listing title".In the text, update Listing title to Title of [insert your marketplace offering here]. On Teetribe, this could be Title of Design.
Search
"EditListingDetailsForm.description": "Listing description".Update Listing description to Description.
Search
"EditListingPricingAndStockPanel.createListingTitle": "Pricing & stock".Update
Pricing & StocktoPrice.Search
"EditListingPricingAndStockPanel.title": "Pricing & stock of {listingTitle}".Update
Pricing & stock of {listingTitle}toPrice of {listingTitle}.Search
"EditListingWizard.tabLabelPricingAndStock": "Pricing & stock".Update
Pricing & stocktoPrice.
Update purchase process action texts and descriptions. This is a long list! Follow the instructions below or alternatively, go to the rows 1013-1048 of the marketplace text editor and edit the relevant texts in a row.
Search
"TransactionPage.default-purchase.customer.completed.title": "You've received your order!"Update
You've received your order!toYou’ve received a download link!Search
"TransactionPage.default-purchase.customer.delivered.title": "Your order is on its way!"Update
Your order is on its way!toYou've been sent a download link!Search
"TransactionPage.default-purchase.customer.received.title": "You've received your order!"Update
You've received your order!toYou’ve received a download link!Search
"TransactionPage.default-purchase.customer.reviewed-by-customer.title": "You've received your order!"Update
You've received your order!toYou’ve received a download link!Search
"TransactionPage.default-purchase.customer.reviewed-by-provider.title": "You've received your order!"Update
You've received your order!toYou’ve received a download link!Search
"TransactionPage.default-purchase.customer.reviewed.title": "You've received your order!",Update
You've received your order!toYou’ve received a download link!Search
"TransactionPage.default-purchase.customer.transition-mark-received-from-purchased.actionButton": "I've received my order",Update
I've received my ordertoI’ve received the [type of file your marketplace sells]. On Teetribe, this could beI’ve received the design.Search
"TransactionPage.default-purchase.customer.transition-mark-received.actionButton": "I've received my order"Update
I've received my ordertoI’ve received the [type of file your marketplace sells].Search
"TransactionPage.default-purchase.provider.completed.title": "{customerName} received the order!"Update
{customerName} received the order!to{customerName} received the [type of file your marketplace sells]!Search
"TransactionPage.default-purchase.provider.delivered.title": "You delivered this order from {customerName}."Update
You delivered this order from {customerName}.toYou sent a download link to {customerName}.Search
"TransactionPage.default-purchase.provider.purchased.title": "{customerName} placed an order."Update
{customerName} placed an order.to{customerName} bought a [type of file your marketplace sells].On Teetribe, this could be{customerName} bought a design.Search
"TransactionPage.default-purchase.provider.received.title": "{customerName} received the order!"Update
{customerName} received the order!to{customerName} received the [type of file your marketplace sells]!Search
"TransactionPage.default-purchase.provider.reviewed-by-customer.title": "{customerName} received the order!"Update
{customerName} received the order!to{customerName} received the [type of file your marketplace sells]!Search
"TransactionPage.default-purchase.provider.reviewed-by-provider.title": "{customerName} received the order!"Update
{customerName} received the order!to{customerName} received the [type of file your marketplace sells]!Search
"TransactionPage.default-purchase.provider.reviewed.title": "{customerName} received the order!"Update {customerName} received the order! to {customerName} received the [type of file your marketplace sells]!
Search
"TransactionPage.default-purchase.provider.transition-mark-delivered.actionButton": "I've delivered this order"Update
I've delivered this ordertoI’ve sent a download link
Save changes.
Make sure to retain all special characters in the file, such as quotation marks, commas, and brackets. The editor will notify you if you try to save incomplete strings.
10. Add content
Creating content pages for your marketplace is work that never ends, depending on how you approach your content strategy. But in the beginning, you’ll need just three pages to get started:
A landing page: The first page most users land on. It's where you present your value proposition and convince people to give your marketplace a try.
Terms of Service: A legal agreement between you (or your marketplace) and the user who wants to use your service.
Privacy Policy: A statement or legal document that discloses some or all of the ways your marketplace gathers, uses, and manages the user data that you collect.
So our goal in this step of the tutorial is to get those pages ready to go. Once you launch, you can keep adding content pages for different purposes: educating your users, sharing more about your business, optimizing your marketplace for search engines, etc.
Go to Content → Pages.
Let’s get started with a simple task:
Delete the About page. Alternatively, you can edit this page with relevant content about your marketplace, especially if you already have a great story to tell.
11. Edit the landing page
The first version of our sample landing page will be quite simple. You can keep adding to and editing it as you run your business.
In this tutorial, we’ll edit the existing fields in the landing page, but you can also delete existing section and add new ones.
This video is a fast overview of updating your landing page. Check it out or read on for step-by-step instructions.
Open the section Marketplace introduction. The settings of this section will be:
Section name: Marketplace introduction. You can change this to something else, such as Hero. It’s not shown to users.
Section template: Hero. This section is specifically designed to work as the first section of the page.
Section title: a short phrase. It can be a slogan that communicates your very basic value proposition in a quick and attention-grabbing way. For Teetribe, we’ll add “Your next favorite t-shirt design is here.”
Section description: a more detailed description. This text can share more about what your platform is about. For Teetribe, we’ll add “Buy and sell beautiful, top-quality vintage t-shirts on Teetribe. Join the community of t-shirt lovers!”
Section call to action: Internal link
Internal link text: the text on the button link. For Teetribe, we’ll add “Browse designs”.
Internal link address: /s. This is the basic URL for the search results page.
Section appearance: Custom
Background image: Upload an image. It should communicate your value proposition and/or catch the eye. Make sure to use a copyright-free image or an image you own. Check out guidelines and tips for good-looking logos and images. If you don’t have an image yet, you can keep the sample image and update it later.
Background image overlay: Dark overlay. This setting depends on the image you use.
Text color: White. This setting depends on the image you use.
Open the section How it works. The settings of this section will be:
Section name: How it works. Not shown to users.
Section template: Columns. This template has content blocks in a grid.
Number of columns: 3 (or as many steps a customers journey takes)
Section title: A title for the section
Section title size: H2
Section description: Add more detail (optional).
Section call to action: No call to action
Section appearance: Default. The default appeerance has black text on a light gray background.
Open the content block New listing. The settings will be:
Block name: New listing
Block media: No media
Block title: Add a title for the block. This should describe the step in the user flow.
Block title size: H3
Block text: Add instructions. These should describe how to get started with the user flow. You can format the text in content blocks with Markdown, a lightweight markup language.
Block call to action: No call-to-action
Edit the other two content blocks Search and Payment in the same way.
Open the section Featured locations. Since our marketplace is not location-based, we’ll feature different print styles using listing fields instead. You could also make a featured listings section once your marketplace has more listings.
Section name: Print styles
Section template: Carousel. The content blocks are placed in a row and you can scroll them side to side.
Number of columns: 3. This number determines how big the content blocks are. 1 is biggest, 4 is smallest.
Section title: Add a title for the section.
Section title size: H2
Section description: Add more detail (optional).
Section call to action: No call-to-action
Section appearance: Default
Delete existing content blocks (Location - Helsinki, etc.)
Click to add a new content block. Create one for each style. This is the basic structure and setup:
Block name: The name of a category on your marketplace.
Block media: Image.
Image file: Upload an image. It should describe the category.
Aspect ratio: Portrait. Choose the one that best fits the products on your marketplace or the image you’re using. All block images should have the same aspect ratio for the best looking results.
Image alt text: Description of the image. The alt text is important for accessibility and search engines.
Block title: The name of a category on your marketplace.
Block title size: H3
Block text: Leave empty
Block call to action: Internal link
Internal link address: /s?pub_[field_ID]=s. You get the exact URL by going to your search results page and filtering by the field you’re adding to the landing page. From the URL, copy everything start /s?. This is the internal link URL to that category. For example, for Teetribe, the URL for the field for print style “Graphic” would be /s?pub_graphic=s.
Repeat step seven to create as many content blocks you need.
Delete section Explainer video. We don’t yet have a video promo for our marketplace, so we’ll delete this section. We can add a video section and other types of sections later at any time.
Go to the SEO & Social tab. Update the following info:
Page title: You can use your slogan or hero section title here.
Page description: Describe your marketplace in less than 160 characters.
Page title for social media: You can use the same text as the page title here.
Page description for social media: You can use the same text as the page description here.
Page image for social media: Upload an image here if you want the page to have a unique image when it’s shared on social media. Otherwise, the image will the default social media image you can upload in the branding settings.
Save changes.
12. Edit the terms of service and privacy policy
The fastest way to update your terms of service and privacy policy is to use the free templates provided by Termsfeed, which you can find here in the Help Center.
This video walks you through updating the legal pages. Read on for written instructions to do the same.
The process is very similar for both documents, so the video and this tutorial both use Terms of service as the example. You can follow the same steps to update the privacy policy.
Open the Terms of service template. The file is a Google Doc, formatted in Markdown.
Copy the contents of the document to the text editor of your choice.
Search for
{{--INSERTto find all the places that you need to replace with your own information. The text will always indicate what should be added, such as{{-- INSERT HERE YOUR MARKETPLACE NAME --}}.Update all the variables in your document.
Read through the document carefully to see that it matches your practices.
Copy the terms, excluding the instructions and disclaimer at the top of the document.
Go to the Terms of service page in Console.
Open the section Terms of Service content section.
Open the content block Text content.
Paste your terms of service in the Block text field.
Save changes.
And repeat the same process for the privacy policy! Go to Content → Pages → privacy-policy. Find the privacy policy template here.
13. Edit the footer
The final feature to update in this tutorial is the footer. We’re almost ready to launch!
The footer is an element of your website that’s located at the bottom of each page, with the exception of the search results page.
Go to Content → Footer.
Set it up as follows:
Slogan: A short description of your marketplace.
Copyright: © [Current year] [Your marketplace name]. All rights reserved. For example: © 2024 Teetribe. All rights reserved.
Number of content columns: 2. You can update this later if you add more links to your footer and want to divide them into more columns.
Social media links: Update and add links to your social media channels. The links automatically render as logos.
Content blocks: Add text content and links, formatted in Markdown. In this tutorial, we’re making only one change: removing the link to the About page, since we deleted the page earlier. Open the block named general and remove - [About](/about).
Here's an example of what the footer can look like. It always includes your marketplace logo, which you add in the branding settings.

14. Test your marketplace
Now, it’s time to test your marketplace. You may already have done so earlier, but it’s always good to see how the changes you’ve made in Console show on your marketplace website.
So head over to your test marketplace and set yourself in the mindset of a new user.
Create an account
Create a listing
Add payout information.
Create a second user.
Buy the listing.
In the Manage users page, you can log in as any user to easily switch between test users to complete a transaction, all the way to delivery and reviews.
Testing how your marketplace works super important in learning how it will work for your actual users. This way, you’ll be able to help them if they run into any problems and also, find out if there are still some settings you’d like to change or information to add.
15. Go live
Once your marketplace is configured, it’s time to go live. This doesn’t mean launching your marketplace to the entire world. The first steps after going live can be onboarding supply or inviting in early adopters to validate your idea.
To go live, you’ll need a live Sharetribe subscription: Lite, Pro, or Extend. Lite and Pro are plans for no-code marketplace builders. The Extend plan is for people who are customizing their marketplace with code. You can learn more about each plan and their features on Sharetribe’s pricing page.
In your test environment, click “Go live”. You’ll be prompted to choose a billing period (monthly or annual) and a plan.
Start a subscription. Your live marketplace will be set up based on your test environment setup. Even after going live, we recommend making all changes in your test environment, testing how they work, and only then copying them to live.
In your Live environment, add your Stripe account and map provider if location is relevant to your marketplace.
(Pro plan) Configure your custom domain and outgoing email address
(Pro plan) Set up the Zaps to request and send a download link in your live environment.
If you want to limit access to your marketplace in the beginning, visit the access control settings. With these features, you can:
Make your marketplace private: only logged in users will see listings and user profile. Great for a marketplace in the beta stage or if you’re still in the process of building supply.
Approve each user separately: instead of giving new users full access, you can approve users manually.
Restrict publishing rights: instead of letting every user post listings, you can grant permission to publish listings to specific users.
Approve listings before publishing: You can also limit listing publishing on the listing level, for example if you want to review each listing for quality.
Other features to check out
In addition to the features in this tutorial, Sharetribe has a host of other great functionality that might help your marketplace or become relevant later. Here’s a quick overview of them!
User types: User types let you differentiate between the user experiences of sellers and customers. This is most important for B2C and B2B platforms, but sometimes, making this difference can be useful for P2P marketplaces as well. Learn more about user types.
User fields: User fields let you ask for more information about your users during signup and in their user profiles. This information can be great for building community and letting users create rich profiles. You can also limit user fields to specific user types, if you only want your sellers to add additional information, for example. Learn more about user fields.
Access control: If you want to differentiate further between the sellers and buyers in your marketplace, access control features let you that. For example, you could only give publishing rights to sellers to guarantee high quality listings. Learn more about access control.
Categories: Categories are a useful tool to organize your marketplace and help people find what they’re looking for. For example, if you broaden your marketplaces offering to different kinds of digital files, adding categories can be a good idea. Learn more about categories.
Top bar: By default, the top bar includes the logo, search bar, and links to sign up, log in, and a button to post a new listing. In the top bar settings, you can add links to other pages. Learn more about the top bar.
Email texts: Similarly to the marketplace text editor, the email text editor let’s you modify the text content of the automatic emails sent to users from your marketplace at key events, like when a purchase happens. Learn more about email texts.
Minimum transaction size: If the downloads sold on your marketplace are generally quite low-priced, it may be useful to set a minimum transaction size to guarantee that your commission will be large enough to cover Stripe’s payment fees. Learn more about the minimum transaction size.
Analytics: You can add an analytics provider to monitor traffic on your marketplace. The built-in options are Google Analytics and Plausible. Learn more about analytics in Sharetribe.
The end of the tutorial
This is the end of the tutorial, but your marketplace journey has only just begun! And we’re here to help every step of the way. Reach out to us with any questions you might have about Sharetribe, and we’ll be happy to help.
And if you’re looking for some more generic marketplace business knowledge, there’s no better place to learn than Sharetribe’s Marketplace Academy.
Best of luck with your marketplace business!