Use protected data in an email notification
In this example, we will change a transaction process email notification so that it uses protected data. We will send the provider’s phone number to the customer when the provider accepts the booking request. We will add a phone number input field to Sign up form and edit the biketribe-instant-booking transaction process that was created in the previous part of this tutorial.
Change signup form
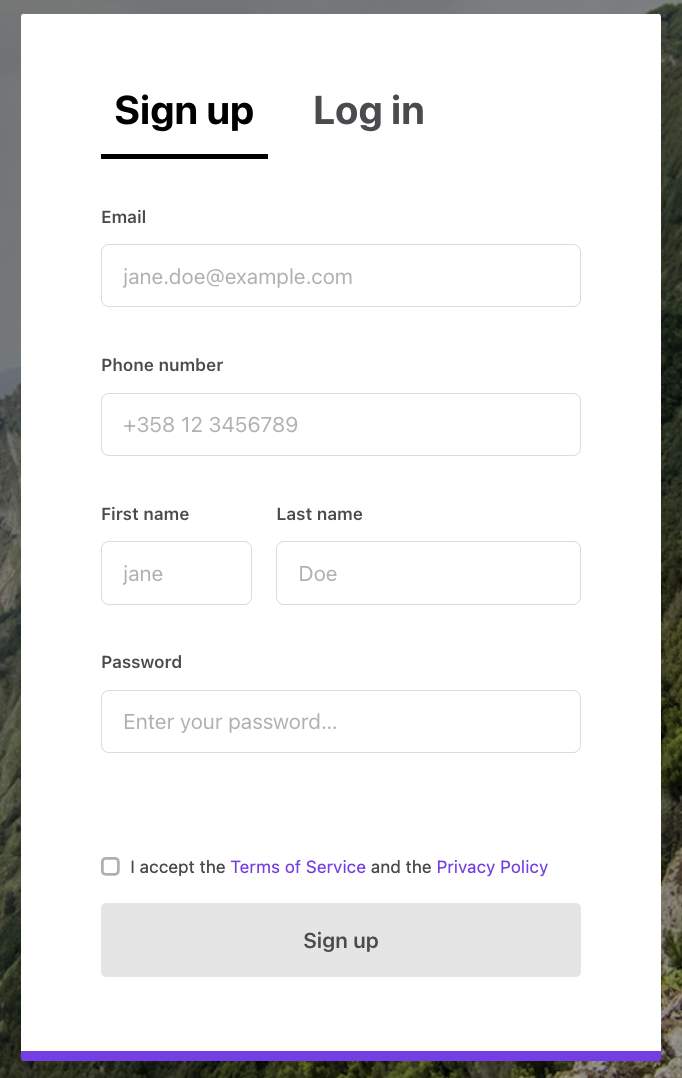
By default, users can save phone numbers on Contact details page (path: /account/contact-details). However, it is not required for all users. Since we want to reveal the provider’s phone number to the customer when the booking is made, we need to collect it first. This should be done on the sign-up page:

Add input component
To make this change, we need to update SignupForm. There’s an existing field to collect phone numbers. It’s called FieldPhoneNumberInput.
└── src
    └── containers
        └── AuthenticationPage
            └── SignupForm
                ├── SignupForm.js
                └── SignupForm.module.css
If you have enabled social logins in your marketplace, you might also want to add a similar FieldPhoneNumberInput to ConfirmSignupForm This way, users who are signing up with e.g. Facebook can also add their phone numbers.
We need to import FieldPhoneNumberInput component and then add it to the form. We’ll add the following JSX code after the FieldTextInput that collects the email address.
<FieldPhoneNumberInput
  className={css.phone}
  id={formId ? `${formId}.phoneNumber` : 'phoneNumber'}
  name="phoneNumber"
  label={phoneLabel}
  placeholder={phonePlaceholder}
  validate={phoneRequired}
/>
The JSX code shown above contains some undefined props - we need to add those missing variables. We add the following lines after the similarly declared variables for the email field:
// phone number
const phoneLabel = intl.formatMessage({
  id: 'SignupForm.phoneLabel',
});
const phonePlaceholder = intl.formatMessage({
  id: 'SignupForm.phonePlaceholder',
});
const phoneRequiredMessage = intl.formatMessage({
  id: 'SignupForm.phoneRequired',
});
const phoneRequired = validators.required(phoneRequiredMessage);
You might want to improve the validation. This “required” validator just checks that the input is not empty.
We also need to add style-rules for css.phone. You can add the following style-rules to SignupForm.module.css:
.phone {
  margin-top: 24px;

  @media (--viewportMedium) {
    margin-top: 32px;
  }
}
Update marketplace texts
Add the required marketplace texts to the en.json file, or in Console > Build > Content > Marketplace texts.
└── src
    └── translations
└── en.json"SignupForm.phoneLabel": "Phone number",
"SignupForm.phonePlaceholder": "+358 12 3456789",
"SignupForm.phoneRequired": "You need to add your phone number",After those changes, you can create a new user account using the sign-up page. Then, if you open the user card in the Sharetribe Console, you should be able to see the added phone number in the user entity’s protected data section.

This is possible because all the extra fields that are added to SignupForm component are saved as protected data to the user entity. This happens in signup function at auth.duck.js.
└── src
    └── ducks
        └── auth.duck.js
Reveal protected data
There are a couple of ways to reveal the phone number to the other party of the transaction. In this tutorial, we release a specific protected data key to the transaction entity. This entity is shared with both parties. To achieve this goal, we need to change the transaction process.
Fetch transaction process
Before we modify our transaction process, it’s better to ensure that we have most the up-to-date version of the process. You can fetch any process version with Sharetribe CLI:
flex-cli process pull --process=biketribe-instant-booking --alias=release-1 --path=./biketribe-instant-booking --marketplace=biketribe-devIf you already have biketribe-instant-booking directory you can’t pull the process. You need to either change the —path parameter or use a —force flag at the end of the command to overwrite the existing directory.
Update confirm-payment transition
When we open up the process.edn file from the fetched transaction process, we should be able to find the configuration for transition/confirm-payment.
To reveal the provider’s protected data, we add a new action to that transition:
action/reveal-provider-protected-data
In addition, we add a configuration to that action. The key-mapping config means that we use the :phoneNumber attribute from the provider’s protected data, and rename it as :providerPhoneNumber when it is saved to the transaction entity’s protected data.
  {:name :transition/confirm-payment,
   :actor :actor.role/customer,
   :actions
   [{:name :action/accept-booking}
+   {:name :action/reveal-provider-protected-data,
+    :config {:key-mapping {:phoneNumber :providerPhoneNumber}}}
    {:name :action/stripe-confirm-payment-intent}
    {:name :action/stripe-capture-payment-intent}],
   :from :state/pending-payment,
   :to :state/booked}
Update email template
To use the phone number from the transaction entity, we need to update the email template: booking-confirmed-customer-html.html. You can find that file from the fetched process directory:
└── biketribe-instant-booking
    └── templates
        └── booking-confirmed-customer
            └── booking-confirmed-customer-html.html
We add a new paragraph inside a section where transaction context is
available: between {{#with transaction}} and {{/with}}.
<!-- ... -->
{{/each}}
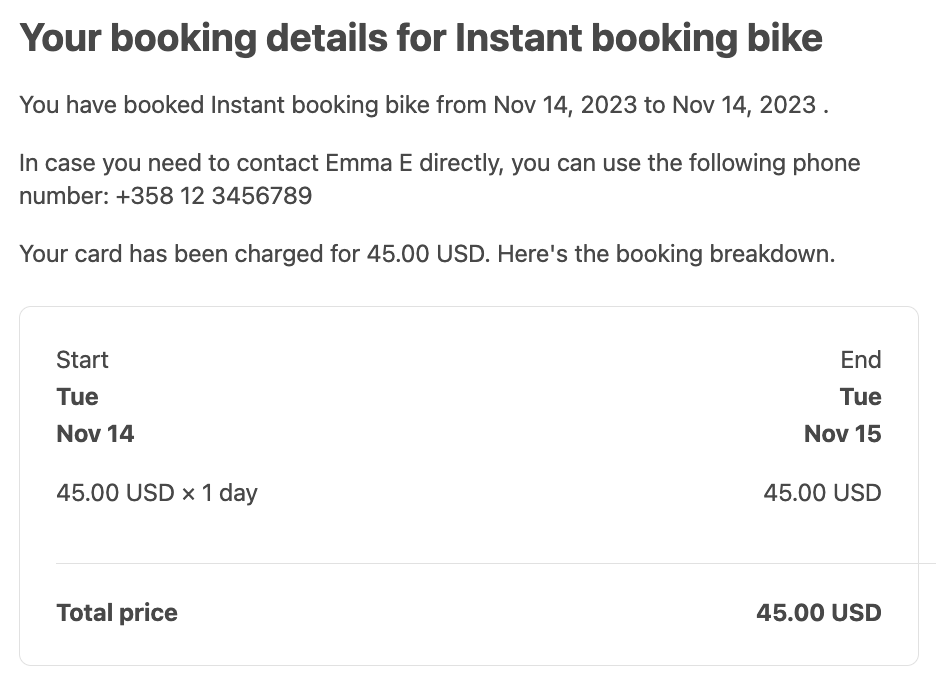
+ <p style="font-size:16px;line-height:1.4;margin:16px 0;color:#484848">In case you need to contact {{provider.display-name}} directly, you can use the following phone number: {{protected-data.providerPhoneNumber}}</p>
<p style="font-size:16px;line-height:1.4;margin:16px 0;color:#484848">Your card has been charged for
{{> format-money money=payin-total}}. Here's the booking breakdown.</p>How to test the email template rendering locally?
To test the protected data using Sharetribe CLI’s built-in preview functionality, you need to use a custom sample-template-context.json.
You can read more from the Sharetribe CLI article: Edit email templates with Sharetribe CLI
The short guide of the necessary steps:
- Download the default sample-template-context.json
- Change protected data inside it:
"protected-data" : { "providerPhoneNumber": "+358 12 3456789" }, - Use Sharetribe CLI’s preview with that context:
flex-cli notifications preview \
  --template biketribe-instant-booking/templates/booking-confirmed-customer \
  --context sample-template-context.json \
  --marketplace=biketribe-dev
Push process changes
Now that we have edited the transaction process and its email templates, we need to push a new version of biketribe-instant-booking process. If you have done the earlier parts of the tutorial this process should be already quite familiar to you. If you need more detailed information take a look at the Edit transaction process with Sharetribe CLI tutorial.
Push the updated process:
flex-cli process push --process=biketribe-instant-booking --path=./biketribe-instant-booking --marketplace=biketribe-devCheck the version number from the output of the previous push command.
With process list command you can get the overall picture of versions and process aliases:
flex-cli process list --process=biketribe-instant-booking --marketplace=biketribe-devUpdate the alias to point to the latest version of the transaction process:
flex-cli process update-alias --alias=release-1 --process=biketribe-instant-booking --version=4 --marketplace=biketribe-devTest transaction in your dev environment
Now all the relevant changes are made, and the transaction process is updated. It is time to test our new process with a transaction. You should create two new user accounts for your dev marketplace and create a listing for one of them. Then, with the other account, book the newly created listing.
When you accept the booking request, you should see email notification sent to the customer’s email address.

Existing transactions are tied to the version of the transaction process that was used at the time those transactions were created. So, you need to create new transactions to test the updated process.
Summary
In this tutorial, you
- Added a phone number input to SignupForm to save the user’s phone number in their protected data
- Updated a transaction process to reveal the provider’s phone number to the transaction’s protected data
- Updated a transaction process notification to include the provider’s phone number from transaction protected data